
Monday, September 27, 2010
One more sleep til Tuesday.
Tomorrow is my big day and my bags packed with a few exceptions of last minute throw ins, I'm finally departing on my big trip. An overnight rendezvous with my amazing boyfriend (or should I say "fiance" hehe Funkin you silly boy!) in LA then off to Boise Idaho to meet the fam and friends. Will post pics ASAP!
Thursday, September 23, 2010
Taking the leap of faith.
Lately my life has been anything but peachy keen and the added stress of tackling more hurdles head on is insane. Til last night when I made the last minute decision to go back home with my man, sometimes the most complicated decisions are the simplest ones. So here I go taking the plunge, Ant's mams is booking the flight morning her time and I leave on Tuesday - 4 days away! This is probably the most spontaneous thing I've ever done but the most exciting and i can't wait to rendezvous with Anthony in L.A and hopefully suprise my parents too. Then it's hello Idaho, very very anxious about meeting his friends and family but I can't wait either.
Sunday, September 12, 2010
Notebook Cosy.

I'm off overseas for a week and it suddenly dawns on me that I don't have anything to carry my new hp notebook in. When I bought it the guy asked if I needed any accessories, I just assumed my old laptop's bag would be adequate and it would've been if it had been able to fit in it. So I've made a cute, bright and colourful "cosy" for my notebook, fits amazingly and has padding to soften and bumps that might occur on my travels. I used the scraps from my dress to make this so it is a patchwork design, and matches my dress too!


Saturday, September 11, 2010
A summers day in the garden cont.
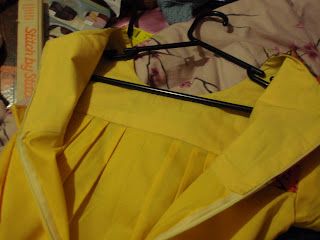
I spend the day piecing together little triangles and flattening seams - patchwork = time consuming, but boy does it pay off! BTW who said snap on presser feet are easy to use?? cos I could not manage to change the feet, still managed to attach a invisible zipper though. Here are some photos of the process and result.
Probably one of the finest pieces I've made so far!


Probably one of the finest pieces I've made so far!


Patchwork front and back.


The dress completed.

The very tidy interior of the dress, no loose threads or fray worthy edges!
Friday, September 10, 2010
A summers day in the garden.
 |
| My "Jelly Roll" |
 |
| My inspiration - bought this dress at Surfers couple of years back and still loving it! |
 |
My design. |
 |
| Colour scheme. |
The first thing I did was make a paper pattern with my favourite pink mini dress (my inspiration) as a template then ironed the material flat before pinning and arranging the pattern on the cloth and cutting out my pieces. Silly me forgot to buy matching thread so I can't start sewing til I get it.
In the meantime I started designing my patchwork, I already have a couple of ideas for the patchwork detail on the yoke but I think I'm going with the bottom left one. Still got to put together the back though.
In the meantime I started designing my patchwork, I already have a couple of ideas for the patchwork detail on the yoke but I think I'm going with the bottom left one. Still got to put together the back though.

 |
| A square. |
 |
| Yoke Variations. |
Wednesday, September 8, 2010
Bout time innit!
 |
| Wet blocking - folded in half to ensure symmetry |
 |
| trying to smooth out the centre crease :) |
Tuesday, September 7, 2010
Fish & Chips
 |
| My battered whiting fillets. |
 |
| Yummy! |
Sunday, September 5, 2010
Socks for dad.
 |
| my sock so far. |
Sweet Treats.
The sun is shining and I really should be outside but today I'm spending time in the kitchen, on the menu Cherry Jelly Slice and Chocolate Cheesecake. Remember back in the day when slices were all the rage? Well I dove into my mum's treasure trove of old cookbooks and pulled out The Australian Womens Weekly CAKES & SLICES cookbook, flipped through it and landed on a delightful lil square of jelly, marshmallow and biscuit.
Preparation takes about 30mins and it keeps for about 2 days.

2 Cups (250g) sweet biscuit crumbs (you can use any type you want I chose oatmeal)
125g butter, melted
100g marshmallows
1 teaspoon gelatin
1/4 cup milk
1/4 teaspoon strawberry essence (or desired flavour)
2/3 thickened cream
250g punnet strawberries, halved (substituted with frozen berry mix)
2x 100g packets strawberry jelly (I used 1x170g packet of Cherry Jell-O)
2 cups of boiling water
Grease a 19 x 29cm lamington pan.
Combine biscuits and butter in bowl and press evenly over the base of the pan; chill til firm.
Combine marshmallows, gelatin and milk in a saucepan, stir over low heat without boiling til marshmallows dissolve. Transfer to large bowl, add essence and cool to room temp.
Whip the cream til soft peaks form then fold into the marshmallow mixture, pour and spread evenly over the base and place the strawberry halves over it. chill for 30mins or til the marshmallow is firm.
Dissolve the jelly in boiling water; cool to room temp then pour over the strawberries. Chill til firm before cutting.
*note: make the next layer while you chill and it should be firm enough before you add the next later, make sure the jelly is cool enough before adding or you will melt the marshmellow layer. Also lining the pan with baking paper makes it easier to remove from the pan.
For my dark chocolate cheesecake I found one online, it was a little tricky and I think it would be tough to make without a commerical cake mixer (not a hand mixer). Also using the cream cheese at room temp helps cos it can stick to the beater if it's too hard and cold. When you add it to the chocolate keep the chocolate over the pan to keep it warm and add a really tiny bit into the chocolate - to prevent it seizing - very important!! I'm going to put a berry glaze over mine to make it look a lil bit fancy. :)
Ingredients
900 g cream cheese
190 g caster sugar (added 4 teaspoons of low cal sweetener instead)
1 tsp vanilla extract
4 eggs
200 g chocolate, roughly chopped (I used caburys 70% dark chocolate)
For the base
200 g digestive biscuits (Used 1 packet Arnotts Chocolate Ripple cookies instead)
2 tbsp cocoa powder
150 g unsalted butter, melted
1. Preheat the oven to 150C Gas 2.
2.For the base: Roughly break up the digestive biscuits and put them in a food processor with the cocoa powder. Process until finely ground.
3. Slowly pour the melted butter into the processor while the motor is running. Press this mixture into the base of a 23-cm springform cake tin greased and base lined with greaseproof paper.
4. Press this mixture inot the base of the prepared cake tin, using the ball of your hand or a tablespoon to flatten and compress it. Refrigerate while you make the topping.
5. Put the cream cheese, sugar and vanilla extract in a electric mixer or use a handheld electric whisk and beat on slow speed until you get a very smooth, thick mixture.
6. Add one egg at a time while still mixing. Scrape any unmixed ingredients from the side of the bowl after adding the second and last eggs.
7. Mix till smooth and creamy, the mixer can be turned up to a higher speed at the end of to make the mix a little lighter and fluffier. Be careful not to overmix or the cheese will split.
8. Melt the chocolate in a bowl over a saucepan of simmering water (don't allow the base of the bowl to touch the water).
9. Spoon a little of the cream cheese mixture into the melted chocolate, stir to mix then add a little more. This will even out the temperatures of the two mixutures. Eventually stir all the cream cheese mixture chocolate mixture until combined.
10. Spoon the mixture onto the cold base. Put the tin inside a deep baking tray and and fill with water util it reaches two-thirds of the way up the cake tine. Bake for 40 -50 minutes, checking regularly after 40 minutes.
11. Don't overcook it should be wobbly in the centre. Leave to cool slightly in the tin, then cover and refridgerate overnight before serving.
From The Hummingbird Cookbook, published by Ryland Peters & Small
Preparation takes about 30mins and it keeps for about 2 days.

Strawberry Jelly Slice
2 Cups (250g) sweet biscuit crumbs (you can use any type you want I chose oatmeal)
125g butter, melted
100g marshmallows
1 teaspoon gelatin
1/4 cup milk
1/4 teaspoon strawberry essence (or desired flavour)
2/3 thickened cream
250g punnet strawberries, halved (substituted with frozen berry mix)
2x 100g packets strawberry jelly (I used 1x170g packet of Cherry Jell-O)
2 cups of boiling water
Grease a 19 x 29cm lamington pan.
Combine biscuits and butter in bowl and press evenly over the base of the pan; chill til firm.
Combine marshmallows, gelatin and milk in a saucepan, stir over low heat without boiling til marshmallows dissolve. Transfer to large bowl, add essence and cool to room temp.
Whip the cream til soft peaks form then fold into the marshmallow mixture, pour and spread evenly over the base and place the strawberry halves over it. chill for 30mins or til the marshmallow is firm.
Dissolve the jelly in boiling water; cool to room temp then pour over the strawberries. Chill til firm before cutting.
*note: make the next layer while you chill and it should be firm enough before you add the next later, make sure the jelly is cool enough before adding or you will melt the marshmellow layer. Also lining the pan with baking paper makes it easier to remove from the pan.
For my dark chocolate cheesecake I found one online, it was a little tricky and I think it would be tough to make without a commerical cake mixer (not a hand mixer). Also using the cream cheese at room temp helps cos it can stick to the beater if it's too hard and cold. When you add it to the chocolate keep the chocolate over the pan to keep it warm and add a really tiny bit into the chocolate - to prevent it seizing - very important!! I'm going to put a berry glaze over mine to make it look a lil bit fancy. :)
 |
| Just chilling :) |
Hummingbird Chocolate Cheesecake
Ingredients
900 g cream cheese
190 g caster sugar (added 4 teaspoons of low cal sweetener instead)
1 tsp vanilla extract
4 eggs
200 g chocolate, roughly chopped (I used caburys 70% dark chocolate)
For the base
200 g digestive biscuits (Used 1 packet Arnotts Chocolate Ripple cookies instead)
2 tbsp cocoa powder
150 g unsalted butter, melted
1. Preheat the oven to 150C Gas 2.
2.For the base: Roughly break up the digestive biscuits and put them in a food processor with the cocoa powder. Process until finely ground.
3. Slowly pour the melted butter into the processor while the motor is running. Press this mixture into the base of a 23-cm springform cake tin greased and base lined with greaseproof paper.
4. Press this mixture inot the base of the prepared cake tin, using the ball of your hand or a tablespoon to flatten and compress it. Refrigerate while you make the topping.
5. Put the cream cheese, sugar and vanilla extract in a electric mixer or use a handheld electric whisk and beat on slow speed until you get a very smooth, thick mixture.
6. Add one egg at a time while still mixing. Scrape any unmixed ingredients from the side of the bowl after adding the second and last eggs.
7. Mix till smooth and creamy, the mixer can be turned up to a higher speed at the end of to make the mix a little lighter and fluffier. Be careful not to overmix or the cheese will split.
8. Melt the chocolate in a bowl over a saucepan of simmering water (don't allow the base of the bowl to touch the water).
9. Spoon a little of the cream cheese mixture into the melted chocolate, stir to mix then add a little more. This will even out the temperatures of the two mixutures. Eventually stir all the cream cheese mixture chocolate mixture until combined.
10. Spoon the mixture onto the cold base. Put the tin inside a deep baking tray and and fill with water util it reaches two-thirds of the way up the cake tine. Bake for 40 -50 minutes, checking regularly after 40 minutes.
11. Don't overcook it should be wobbly in the centre. Leave to cool slightly in the tin, then cover and refridgerate overnight before serving.
From The Hummingbird Cookbook, published by Ryland Peters & Small
 |
| mmm...chocolatey cheesy mmm mmm-licious! |
Friday, September 3, 2010
When life gives you lemons make lemonade!

And for a grown up twist bruise a couple of mint leaves at pop them in when you serve it up.
You can add as little or as much sugar as you want it's just a matter of taste preference of how sweet you like it, I like my lemonade not too sweet but not too tart either so to me this was perfect. However the key ratio is 1 cup lemon juice to 1 cup sugar/sweetener. Next time I'll try with tangerines - I saw a recipe in a Jamie Oliver book and vowed to try it but haven't yet.
Finished!! :D
 |
| My Aran Cable bag. |
Finally finished my Aran Cables knitted bag, heres the run down...
Main body: Moda Vera Alpaca/ virgin wool blend on 6.00mm needles
Lining: Bella baby 4ply (Acrylic/nylon) in Blossom on 3.25mm needles
Handles: Bag Lady Bangle bag handles
And a pretty purple satin bow to top it all off!
I did everything to measurements 15'' high (inc. handles), 14'' wide and 9.5'' deep.
 |
| Before - Blocking the body. |
The lining took awhile to do because I chose to use such small needles, although I the result was second to none, even has a little pocket for lippy and phone! I also made it slightly smaller than the outside because it has a bit of stretch and I didn't want it to distort the shape of the outside.
Overall very pleased with my new bag!
Overall very pleased with my new bag!
Subscribe to:
Posts (Atom)